Samsung Galaxy Y Young S5360 is one of the popular entry level android smartphone today. But because it is relatively cheap, it does have its limitation. One is its internal phone memory storage. Samsung Galaxy Y has only 160MB of internal storage. Here’s the good news, now you can actually increase that to make room for more apps and games. How? I’ll show you.
UPDATE: Stop! This method might be too complicated and sometimes (or most of the times) doesn’t work at all. I found a new and better solution. Check out my latest article instead -> How to Install or Move Apps to External SD Card in Any Android Phone. This one really works!
Here’s the thing, we are not actually gonna replace any parts of your Galaxy Y or unlock something to increase it’s internal memory. We’re going to make use of the external SD card. Below are the steps on how to increase the internal phone memory of Samsung Galaxy Y S5360.
Note: This procedure is not limited to Samsung Galaxy Y alone and it can also be done in other android smartphones. And proceed with CAUTION. If you’re not careful you will experience data loss in your Samsung Galaxy Y/android smartphone.
Try this procedure at your own risk. I will not be held responsible if you messed up and something happens to your phone
How to increase internal phone memory of Samsung Galaxy Y (or any android smartphones):
1. You will need to root your Samsung Galaxy Y. If your phone is still not rooted read this: How to Root and Unroot Samsung Galaxy Y (Young GT-S5360)
Must Read Article -> The Android Rooting Guide: Things You Need to Know
2. We need to create a partition on your SD Card or your microSD card.
2.a. To create a partition in our microSD Card, we will be needing a free tool called MiniTool. You can download one here.
2.b. After you have download the MiniTool Partition Wizard, install it in your computer and Run MiniTool.
2.c. If your microSD card is new then you can proceed with creating a partition. If not, be sure to back up everything in your microSD card. Creating a partition will delete every data in your microSD card. Proceed with caution. The first time I did this, almost all of my apps and games where gone, but they were still physically installed.
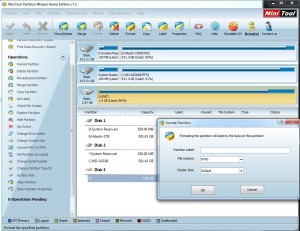
2.d. Plug your microSD card to your computer. While in MiniTool, right click your microSD card drive and format it. REMEMBER: Be sure it is the correct drive and do this after you have backup every data in your card. Select fat32 as file system, hit ok and hit the apply button found in the upper left corner of MiniTool (the one with the big blue check mark).
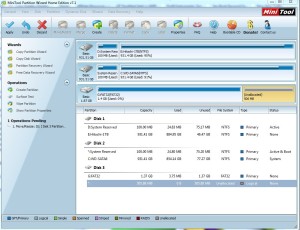
2.e. After you have formatted it, right click on the microSD drive again and select Move/Resize. In my case I created a 1.37GB partition size while the unallocated space is set to 500MB. The unallocated size will serve as the additional internal memory of your android smartphone. Hit ok after you have set the partition size.
2.f. You will see in the MiniTool window an unallocated size in your microSD card. In my case, its about 506MB. Right click and create a partition for it, it will be formatted at the same time. Choose EXT3 as its file system. Hit the Apply button again after. Again be sure to hit the big check “Apply” button otherwise the changes would not be implemented.
3. After partition, you will only see the FAT32 portion of the microSD in your Windows Computer. But in Minitool you will see that there is a FAT32 and EXT3 partition. Now your done with the partitioning.
4. After you have created the two partitions (fat 32 and ext3), remove it and plug your microSD to your Samsung Galaxy Y (or android smartphone)
5. You will also be needing another app called link2sd. You can download link2sd here.
6. Install link2sd in your smartphone, run link2sd and it will ask you to mount script. Choose ext3 and hit OK.
7. After you have successfully done that, reboot your android smartphone.
8. Once your phone returns from reboot, Run link2sd, go to its settings and check everything to auto-link. That should do it!
You’re done! By now you have increase the Samsung Galaxy Y’s internal memory. Another option is to transfer the installed apps to your SD card. You can read my article How to Move Apps from phone memory to SD Card for Android smartphones
If you want to read more about link2sd and how it works, you may go here.
See also: Top 10 Best Battery Saver App for Android
UPDATE:
I tried this process again this time using a 8GB microSD. Below are my notes and observations:
Always hit the Apply button on MiniTool so that changes to your microSD card like formatting and partitioning would be implemented.
If the EXT3 does not work, try using EXT2. It also worked for me.
If you encountered an error something like SD Card 2nd Part “not found” or mount: invalid arguement or /dev/block/mmcblk0p2: device not found Make sure you have two partitions on your SD card and both are primary. use EXT2 instead or EXT3. Make sure you download the official Link2SD from Google Play. Go to options in Link2SD and choose “More” and choose “Recreate mount scripts”. If it doesn’t work try to remove the microSD card from the Galaxy Y and restart your phone and run Link2SD again.
If it does not work, try to do the whole processes again, try EXT2 instead of EXT3. Make sure both partitions are set to PRIMARY.
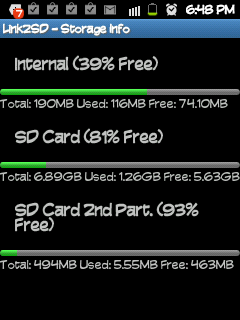
If you have successfully completed the process, the physical internal memory size of your Galaxy Y WILL NOT INCREASE. Instead after the internal phone memory is used up, it will automatically link the internal phone memory to the created partition. I tried to download as many games as possible, and as you can see in the screenshot below it automatically “linked” to the partitioned microSD.


NOTE: Again do this procedure at your own risk! If you are not sure about what you are going to do or what you are doing, then don’t try this at all.


Leave a Reply